With all the sports/activities that I tend to do that often leave me isolated from the rest of the world, I thought it might be prudent for me to purchase some sort of rescue beacon just in case I get hurt or lost, or perhaps my ride suffers a mechanical breakdown. When mountain biking or snowboarding, I sometimes find that I am out of range for a cell phone signal. And when 4-wheeling, I'm definitely without a signal! Sometimes I'm with other people, but that's still no guarantee that we'll be able to make communication to find help. I've considered just renting units when I go on trips, but with the prices that the vendors charge, it just makes more sense to buy my own.
For over a year, I've been looking at small satellite communication units like products from Spot and Garmin. After doing the pros/cons and reading the reviews of the SpotX vs. the Garmin inReach Mini, I determined that the Mini was the handheld unit that I wanted to get. So I waited for it to go on sale. And I waited. and waited. That sucker just never goes on sale! Until Black Friday came :)
Fortunately, I had the good sense to check the sale prices on the Mini and it just happened to be on sale on Amazon! Normally selling msrp for $350, Amazon was listing it for $75 off with free shipping through their provided vendors! Of course I jumped at that price!
The unit itself is tiny and can easily be clipped to your backpack practically unnoticed. It is Bluetooth capable, so it can be paired with an Android or iOS cell phone, where you can use the phone to compose text messages. It is possible to text directly from the unit, but there is no keyboard, so you would be pecking out one letter at a time the old way. A satellite subscription plan is required to get the product to work, but the "safety" plan is pretty nominal at $14.95 per month after I paid the annual $24.95 fee that allows me to suspend the plan at any time during the year, if I don't think I'll be using it. If in trouble, the Mini can send out an SOS beacon via satellite to local authorities advertising my precise GPS coordinates. From there, I can 2-way text with them to work on a plan of action, whether it be helping me to rescue myself on my own (find my way back to civilization) or to just sit tight while they gather a rescue effort to evacuate me.
It's just nice knowing that I'll have a lifeline to the outside world should I need it. $15/month is nothing considering the alternative of dying in the middle of nowhere alone, never to be found. There are just so many other better ways to die!

A collection of blurbs stemming from mostly the motorized projects that I do. Some posts mixed in have to do with my experiences in X-ray school. (Some entries are from older blogs that I killed off.) Some of my toys are a Mazdaspeed Miata that I work on and take to the track, a little Harley that I can't stop modding and an old Yamaha RD400 that I've been collecting parts for over the past 15 years. When I'm not wrenching, sometimes I mountain bike, sometimes I snowboard, sometimes I make beer.
Monday, December 16, 2019
Friday, October 4, 2019
It's Alive!!!!!
A new day, a new challenge, a new chance for success.
I called up a couple of local shops. I spoke to a guy at a Harley shop, but he said he had lots of experience on 2T bikes, so I told him what was going on. I was just desperate to get the bike running. I could tune it myself later. He said he could take the bike, but it wouldn't be done till next week. And unfortunately, he had to leave in an hour to go to a hill climb competition. (Good for him!) But before we got off the phone, he advised me to maybe switch the spark plug wires around, because it really did sound like a timing issue and I agreed. I swapped the wires and it fired up on the second kick! He was right! I'll stop by with some beer for him next week.
I called up a couple of local shops. I spoke to a guy at a Harley shop, but he said he had lots of experience on 2T bikes, so I told him what was going on. I was just desperate to get the bike running. I could tune it myself later. He said he could take the bike, but it wouldn't be done till next week. And unfortunately, he had to leave in an hour to go to a hill climb competition. (Good for him!) But before we got off the phone, he advised me to maybe switch the spark plug wires around, because it really did sound like a timing issue and I agreed. I swapped the wires and it fired up on the second kick! He was right! I'll stop by with some beer for him next week.
Thursday, October 3, 2019
We're Getting Close!
Well, I spent some time putting the bike together a little more. I'm so busy now. Between work (which keeps trying to get me to work more hours) and my dad, who is very sick right now, I'm just trying to squeeze a little work in here and there. After work, I'll come home with a to do list and I'll usually try and do a couple of things off the list just to get a jump on the next days tasks.

Fitting the seat pan was not really a big deal, except that some powdercoating paint was clogging some of the cotter pin holes, so I had to take some tiny drill bits to them to open them up. The gas tank was a tight and secure fit. But getting that tight hosing over some of the fuel fixtures was a bitch.
I ran down to the local Chevron and bought a gallon of the Supreme 91 stuff. I thought it might be a good idea to do pre-mix for the start up, so the engine wouldn't starve of 2T oil and seize up. Doh! I did a 32:1 ratio. I figure that'll be good for startup until the oil is getting sucked up from the Yamalube system.
 While the bike was still on the hydraulic stand, I cut down the rear engine mounting bolt, since the chain was rubbing on it. And I did a quick clean and lube of the brand new chain. I installed the newly painted kick stand and stretched the new retention spring on it. Then I let the bike stand on it's own.
I installed the Factory Pro expansion chambers and attached the new Moose exhaust springs to them. The oil tank was filled and I started putting the pre-mixed gas into the tank. Then panic sets in! The petcock started leaking gas like crazy! The gas was coming through the screw holes! I threw some towels under it, so it wouldn't get on the engine cases too much.
Then came the moment of truth...would the bike start up? I turned the key and made sure the kill switch was on run. then I gave it a kick. Nothing! Then another kick. Still nothing! After about 6 kicks, I turned off the key and gave up. Hmmm....back to the drawing board. Dammit!
Tomorrow I'll try and throw some sealant at that petcock, then I'll check to make sure I'm getting a spark across the plugs. I've emailed Paul to see if he might be able to help me to start it up on Sunday. After he got his money from building my engine, he's been less helpful. Imagine that.

Over the past two days, I installed the oil tank, battery box, seat pan and fuel tank. I know they sound like such easy tasks, but everything always becomes such a big issue! First I couldn't get the filler neck on the tank. Ultimately, I soaked it in some boiling hot water and it was able to stretch over the opening. Mysteriously, the neck clamp got lost, so I had to take some bailing wire and create a clamp. Then I found that I didn't have the screws to secure down the filler neck! Oh, God! another trip to the hardware store! With the seat pan secured to the frame, the oil cap needed to be cut down to fit the profile. And I had to hack about half an inch off the top of the dip stick too. Then there was the battery box that was such a tight fit that I had to grease the rubber mounting pieces to force it in.
Fitting the seat pan was not really a big deal, except that some powdercoating paint was clogging some of the cotter pin holes, so I had to take some tiny drill bits to them to open them up. The gas tank was a tight and secure fit. But getting that tight hosing over some of the fuel fixtures was a bitch.
I ran down to the local Chevron and bought a gallon of the Supreme 91 stuff. I thought it might be a good idea to do pre-mix for the start up, so the engine wouldn't starve of 2T oil and seize up. Doh! I did a 32:1 ratio. I figure that'll be good for startup until the oil is getting sucked up from the Yamalube system.

I installed the Factory Pro expansion chambers and attached the new Moose exhaust springs to them. The oil tank was filled and I started putting the pre-mixed gas into the tank. Then panic sets in! The petcock started leaking gas like crazy! The gas was coming through the screw holes! I threw some towels under it, so it wouldn't get on the engine cases too much.
Then came the moment of truth...would the bike start up? I turned the key and made sure the kill switch was on run. then I gave it a kick. Nothing! Then another kick. Still nothing! After about 6 kicks, I turned off the key and gave up. Hmmm....back to the drawing board. Dammit!
Tomorrow I'll try and throw some sealant at that petcock, then I'll check to make sure I'm getting a spark across the plugs. I've emailed Paul to see if he might be able to help me to start it up on Sunday. After he got his money from building my engine, he's been less helpful. Imagine that.
Tuesday, October 1, 2019
Electrical- My Nemesis
It's been a while since my last update. As for past problems, I was able to pull out one side of the front wheel bearings, then I slipped a very slim shim on top of the spacer, before pressing the bearing back into the wheel, essentially lengthening the spacer just tiny bit. And voila! It worked like a charm! No more binding wheel bearings and I was successfully able to torque down that front axle to 60 ft/lbs.! Yay! That will surely help the steering system rigidity.
I tried filling the rear brake system, but wasn't successful. I tried to burp it. Also used a MityVac to suction the fluid through. I still never got to the end of the air. I got tired of trying to solve such a simple task. I still have a couple of tricks up my sleeve, but I thought I would give it a rest and move onto something else for a while- something that I've been avoiding since the very beginning. The electrical system.
Mind you, it's been over 10 years, since I dismantled the bike. When I pulled out the electrical harness, I tried to label the ends and take lots of pictures best I could. But over the years, some of the printing on the Dymo tape had faded and become illegible. Plus many moons ago, had some shop in Concord, Grumpy Bear (since defunct), rebuild my alternator. When they returned the bike to me, they used whatever colored wire they had on hand, and they hard-wired the alternator to my harness, doing away with any connectors! They just crimped all the wires together! I was young and naive. The bike worked, so what did I care?
Anyway, so for me to wire the alternator to the harness again, I wanted to do it right, to do it stock again. When Paul built my engine, he installed the original correct colored wires with appropriate connectors, minus one which I didn't happen to have at the time. But in order for me to know how to connect the alternator to the electrical backbone, I had to rebuild the old wiring system, marrying the original parts (wires), just so I could realize what had happened. So my old harness didn't have any alternator connectors, plus some it had other issues. I just happened to have three RD400 harnesses!! 1) my original dilapidated harness 2) one that I had purchased from Australia through the early days (late 1990's) of internet buying/trading and 3) I don't even know where this harness came from- I probably just bought another one off eBay.
 Well, after careful analysis, I realized that that Australian harness had too many wires in the front. Let me just put this out there- a simple disclaimer- I suck at ready schematics. So I was afraid to just cap off the "extra" wires, not knowing if I really need them or not. But luckily, the mystery harness was very similar to mine, so I decided to use that one. I did have to re-wrap much of the harness, but it cleaned up quite nicely!
Since I'm using high output coils with more resistance, I needed to get rid of the resistor unit. I did have to look at the schematic to figure that one out, but it wasn't too bad. I had to construct a robust and complicated spreadsheet with all the connection numbers and appendages they belong to, which really aided in patching together the front of the bike.
I spent a few minutes just to hook up the battery to see if I was on the right track. Moment of truth! I turned the key and the oil and neutral light came on! The headlight worked both low and high beam. And the rear turn signals worked, but they didn't blink, because they're LED. So that's a huge step in the right direction! Encouraging.
Tomorrow I'll start attaching the oil tank on the bike. I might be able to fill fluids too. If I'm lucky, I might try kicking the motor over!
I tried filling the rear brake system, but wasn't successful. I tried to burp it. Also used a MityVac to suction the fluid through. I still never got to the end of the air. I got tired of trying to solve such a simple task. I still have a couple of tricks up my sleeve, but I thought I would give it a rest and move onto something else for a while- something that I've been avoiding since the very beginning. The electrical system.
Mind you, it's been over 10 years, since I dismantled the bike. When I pulled out the electrical harness, I tried to label the ends and take lots of pictures best I could. But over the years, some of the printing on the Dymo tape had faded and become illegible. Plus many moons ago, had some shop in Concord, Grumpy Bear (since defunct), rebuild my alternator. When they returned the bike to me, they used whatever colored wire they had on hand, and they hard-wired the alternator to my harness, doing away with any connectors! They just crimped all the wires together! I was young and naive. The bike worked, so what did I care?
Anyway, so for me to wire the alternator to the harness again, I wanted to do it right, to do it stock again. When Paul built my engine, he installed the original correct colored wires with appropriate connectors, minus one which I didn't happen to have at the time. But in order for me to know how to connect the alternator to the electrical backbone, I had to rebuild the old wiring system, marrying the original parts (wires), just so I could realize what had happened. So my old harness didn't have any alternator connectors, plus some it had other issues. I just happened to have three RD400 harnesses!! 1) my original dilapidated harness 2) one that I had purchased from Australia through the early days (late 1990's) of internet buying/trading and 3) I don't even know where this harness came from- I probably just bought another one off eBay.

Since I'm using high output coils with more resistance, I needed to get rid of the resistor unit. I did have to look at the schematic to figure that one out, but it wasn't too bad. I had to construct a robust and complicated spreadsheet with all the connection numbers and appendages they belong to, which really aided in patching together the front of the bike.
I spent a few minutes just to hook up the battery to see if I was on the right track. Moment of truth! I turned the key and the oil and neutral light came on! The headlight worked both low and high beam. And the rear turn signals worked, but they didn't blink, because they're LED. So that's a huge step in the right direction! Encouraging.
Tomorrow I'll start attaching the oil tank on the bike. I might be able to fill fluids too. If I'm lucky, I might try kicking the motor over!
Saturday, September 21, 2019
Perfect Timing
Work has been keeping busy lately, so progress is slow. My painted parts are nearly finished, as I anticipate retrieving them sometime this week. Lately I've been working with some small irritating problems- 1) the used bent kickstart lever I purchased from another forum member didn't quite clear my Tarozzi rearset peg and 2) after torquing down on the front axle, the wheel bearings are bound so tightly against the spacer that they are practically seized up!
The kickstart lever wasn't even close to clearing- it needed another 1.5" of clearance. I really didn't feel like taking a torch to the lever discoloring the chrome finish and all. After some email correspondences with Jim at Fast From the Past, he convinced me the newer improved model would clear the peg, so I took a chance and ordered it. Luckily it did! Problem solved!
With the front bearings, I thought that maybe once I swapped out the old bearings for new, that would take care of the clearance/tolerance issue and it would be a done deal. Nope. I got the new bearings in and same issue
So I had to remove one of the bearings again and now I'm in search of a thin shim, so I can create a little more length on that axle spacer.
I also purchased a dial indicator timing device, so I could get my ignition timed. The indicator was in inches, while I needed to configure the timing in metric- it just took a little calculation and I was all set. The timing is set to 1.8mm BTDC, which should be appropriate for the air intake and chambers I'm running.

I'm hoping to get the electrical cleaned up and wired by the end of next week. Fingers crossed!
The kickstart lever wasn't even close to clearing- it needed another 1.5" of clearance. I really didn't feel like taking a torch to the lever discoloring the chrome finish and all. After some email correspondences with Jim at Fast From the Past, he convinced me the newer improved model would clear the peg, so I took a chance and ordered it. Luckily it did! Problem solved!
With the front bearings, I thought that maybe once I swapped out the old bearings for new, that would take care of the clearance/tolerance issue and it would be a done deal. Nope. I got the new bearings in and same issue
So I had to remove one of the bearings again and now I'm in search of a thin shim, so I can create a little more length on that axle spacer.
I also purchased a dial indicator timing device, so I could get my ignition timed. The indicator was in inches, while I needed to configure the timing in metric- it just took a little calculation and I was all set. The timing is set to 1.8mm BTDC, which should be appropriate for the air intake and chambers I'm running.
I'm hoping to get the electrical cleaned up and wired by the end of next week. Fingers crossed!
Monday, September 16, 2019
My Church of Motorcycle
Lately I've had a lot of little stuff going on, so I've just been picking at the bike little by little. I picked all the parts off the original frame and started installing them on the Primose frame. I got the engine in there and installed the new headset in the frame, then installed the forks. Funny thing (not so funny)- when I was torquing the triple crown nut down and had the forks flopped all the way over to one side, that small amount of effort knocked off the front steering lock stop that I had brazed onto the frame! I was astounded at how weak the bond was! Maybe when the frame went into the oven after powdercoating (twice) it weakened the braze? In any case, I had to sand down the surrounding surface and braze it on again!
Then there's that same problem that I had before with the front wheel bearings. After torquing the front axle, the spacer got smashed in there between both bearings that the bearings wouldn't spin anymore. So I thought that it might be different after I put in the new bearings- perhaps the old bearings were so loose that they moved too much. Well, after putting the new set of bearings in, the same thing happened! Argh!!! I think I'm going to just add a thin shim between one of the bearings and the spacer, hoping that it would create some relief. I'll get to that later- that problem isn't going anywhere.
I also had an issue that had been bugging me for a while- the pre-bent kickstarter lever that I bought from another forum member did not clear the Tarrozzi rearset peg. I somehow thought that it could be an issue with fitment from the Marsh frame, so I decided I would revisit the problem when I swapped the motor to the Primrose frame. Guess what?! The problem didn't go away!
I knew that the PO had purchased that kickstart lever from HVC and I also had the feeling like Fast From The Past had the exact same product, so I emailed them both to see if they knew of a fix. Brad from HVC had a fairly useless (unhelpful) response. Jim from FFTP suggested that perhaps the "boss" was not straight (the piece that actually clamped onto the spline). Since I had the original boss, I swapped out the parts, but it yielded the same results. I emailed the guy I bought the kickstarter from, just to give him a shout. He was very receptive and offered the refund my money if I chose to return it. I did still have the option of throwing some heat at the lever (the original straight lever for that matter), but I didn't really want to discolor the chrome. Part of me was saying that I shouldn't have to modify an already modified part- it should work as it was designed to work. I saw that there was a new and improved lever that HVC and FFTP was selling now. Jim said that if I bought a new lever from him and it didn't clear the peg, I could return it, so I pulled the trigger and bought another new lever. After almost 2 weeks of dicking around with this problem, I put the new lever on and guess what?! It clears the peg!! I emailed Jim and shared the good news. Problem solved!
So today I got a bunch of stuff done! I mounted the license plate and LED bolts (only to find out later that I had to rip it off the frame, since it wouldn't clear the rear tire), and the rear turn signals. I cut and installed the rear fender. I cabled up the carburetors and oil injector pump, then synced and adjusted the play on them. I installed all the carb overflow hoses. Then I mounted the rear wheel, cut and installed the chain. (That was a bitch, since I couldn't press out the pin, then I finally realized that I had 2 chain breaker tools sitting in my tool drawer!) I installed the clutch cable and adjusted the clutch lever. The clutch lever itself was a little sticky, so I had to sand down the surfaces a little to relieve the pressure points.
All in all, it was a pretty productive day. More positives than negatives. Can't beat that with a stick.
Monday, September 2, 2019
Finally Finished Up Those Pesky Wheels!
Tomorrow I'm heading to the CHP to get VIN verified, hopefully for the last time. Please Lord, just let Officer Buchannon sign me off! And please let AAA DMV take my verification proof and registration payment, so I won't have to go back to that dreaded DMV line to wait 2 hours!
I don't know why, but I have totally been dreading doing the work on these wheels. Maybe because I don't know what I'm doing and there's a whole lot of guessing going on?
So last week, I had Cycle Gear mount the new tires. When I went to pick them up, they told me that they didn't use the tubes, nor were they able to fit them in anyway. I do know for a fact that they fit, as many others online have done it, but I'm sure it takes much more skill than they have. I didn't argue too much, although I was slightly leery that they might blow off in the middle of a turn one day. But they did seem to be holding air pretty well. I told them I'm sleep on it and if it really bothered me, we'd have to figure something out. Well, after searching around the internet, I think that since the RD400 was literally the first bike in history to come from the factory with cast mags, Yamaha didn't really think about putting an indent around the rim for the bead. Other subsequent models came with tubeless tires and their wheel profiles looked exactly the same. Days later, the tires are still holding air.
So over this Labor Day weekend, I was able to squeeze some time in today to get my wheels painted and polished. Yesterday morning, I stopped by my FLAP and grabbed me a free bearing setting tool rental. Then I went home and pounded the wheel bearings into place. All went well.
This morning, I loaded up my swamp cooler with ice and water and got busy finishing the polishing of the sides of the rims. One of the wheels, I had already done, but it needed a little touch-up love, since the CG guys gave it some scratches with their tire irons. The task didn't take long.
It took me about an hour to mask up the wheels for painting, but it really made the paint job so much easier to do. A little thinner afterwards to clean up the overspray and I was good to go! I cleaned up the brake discs, associated hardware and other wheel hardware parts. Then I installed the new 520 37T rear sprocket. It looks solid. I can't wait to give it a whirl!
Here are some before and after pics of the wheels.


The gold paint was a little brighter than I had anticipated, but I'm good with it. The job came out fantastic and the paint against the polish was tight.
I got the wheels mounted on the bike, so tomorrow morning, I just have to install the exhaust chambers and I good to roll the bike back on the trailer. Wish me luck!!
Thursday, August 29, 2019
DMV Woes
So I trailered up the RD this morning and took a short drive to the local DMV. Another swing and a miss! Since my federal sticker was illegible, I got referred to the CHP. Luckily I made an appointment earlier in anticipation of this problem. Now I have to wait another week to get verified! Oh well, I can probably spend some time polishing and painting the wheels....


Monday, August 26, 2019
Trouble in Tinseltown....
I'm trying to get the wheels all situated now, so I can get the bike in for inspection. Yesterday, I tried getting the bearings out of the front wheel. No bueno. That flippin' axle spacer is in there so tight that it won't budge to one side or the other but just a teenie bit and that's just not enough for the drift to get a bite on the inner race. I decided to wait till I tear down the bike again later, then give it another whack. So I figured I'd just do a dry fit on the fork, before getting the tire on there. After I started torquing on the axle, the wheel wouldn't spin anymore! What the heck??! I can't just leave it loose or the forks will twist. I removed the wheel from the forks and checked the bearings. They were frozen! I think that space itself is frozen in there and when the inner race of the bearings got tightened against the spacer, the bearings won't spin any more. Dammit! After doing some research online, I bought a bearing removal kit off of Amazon for $28. I'll take care of that later.
Today I was putting on the front tire. I bought some new 11" tire irons, so the leverage factor will be much easier. I sprinkled some talcum powder inside the tire and filled my spray bottle with soapy water and I was off to the races. Everything was going as planned, albeit tough, as changing tires is always tough. But after I was done and was filling the tube with air, it seems that there's a leak at the stem!! Somehow, the tube must've gotten pinched when I was installing it!
I seem to have a bad luck when installing tube tires. I had to do that twice on the Harley front wheel. Then the tubes exploded two times about a day later. I finally took the wheel into Cycle Gear to have them do it. We discovered that I was recommended, but the Jake Wilson website, to buy the wrong size tube for that tire! That's why it kept bursting. For $15 I had them install it. It's been fine ever since. I think I'm going to do the same thing for both of these wheels. I'm so sick of changing tires having them lose air!! ARGHHH!!!!!
Thursday, August 22, 2019
Inching Closer to D-Day
I spent the last couple of days painting a couple of parts. I had purchased a fuse panel a long time ago and although it was in excellent condition, it was white. I'm guessing that perhaps some previous owner thought it might match the color scheme of his bike better or something like that. While I was at it, I gave my battery box a good scrubbing to get the surface rust off, then I shot it with a few coats of black paint. I was finally able to put some of the new rubber parts on the battery box. Check that off my list!
Today I spent some time tooling on the carbs- installing the new pilot jets and mains. The pilot was size 30 and just for a guaranteed starting point, I installed 270's. It'll probably run rich, but better rich than lean. I still haven't adjusted the A/F screw yet.
Then I started assembling the bike for the DMV. I called my local CHP office the other day, thinking that maybe they make house calls, so I wouldn't have to get a trailer. But no, I would still have to drag my bike down to their office for the verification process. But Officer Buchannon did explain to me the DMV inspection process, informing me that I wouldn't even have to step foot inside the DMV building- I just need to drive my trailered bike around back, where a DMV employee will be waiting for me to do the VIN verification, clipboard in hand. As far as completion- the brakes do not need to be operational, nor does the bike need to start up, so I'm going to leave all the main electrical parts off the bike (battery and harness), as well as cables, that way the disassembly will easier and I can avoid the current headache of hooking up the harness just for the inspection.
I made some great progress. First I had to scrub and install the old nasty swingarm back on the frame, since I farmed out the other swingarm for powdercoating. After I reassembled the rear brake and shocks, I got the carbs and intake system on there, as well as the side covers. I had to do a little scrubbing, so the red parts would look nice. I installed the gas tank and lid. Then I put together the rear fender situation. The bike is probably about 95% inspection ready- I still have to remove the cables from the instrumentation, tuck away some of the wiring, then get the tires and wheels on the bike.


So the next major step is to finish up those wheels. I don't know why I've been so reluctant to work on them. Probably because the task seems so daunting. I still need to polish up the outer rims, install the new bearings, install the new tubes and tires, then shoot paint. Yup. sounds like a real pain in the ass all right...
I did take a minute to check out the riding ergonomics on the bike. I know that the position will be slightly different in it's final rendition, since I'll be installing a lower seat. But still, I was thrilled to be able to get on it. It has been over 10 years, since I last sat on the bike! And I have been dreaming of putting new rearsets on the RD for even longer than that! So to actually realize the work that I've been doing was pure awesomeness!!!

Saturday, August 17, 2019
Back to the Grind
After a 3-week break, I'm finally back working on the RD with a passion! Actually I was running so behind schedule that the first thing I had to do when I got back from vacation was rework my build schedule with some new deadlines.
At the beginning of the week, I tore apart the carburetors to take inventory of what parts I actually still need. I cleaned and rebuilt these carbs over 10 years ago, then put them in a box for safe keeping. At the time, I did take notes of what was needed, but now looking back, the notes were unclear and incomplete- the only way to be certain of needed parts was to do another tear down and take inventory. Luckily the only parts needed were the main and pilot jets- exactly what Paul told me I needed to order for the newly built engine! I turned to my trusty source, economycycle.com, and ordered a range of Mikuni mains from 250-280 and pilot jets in 30.


I removed the two grommet tabs which used to hold the stock airbox in place. I also ground off the center stand mounts that stick out off the rear of the frame, being careful not to cut too much away, since the right side holds the brake pedal spring mount peg, and both are used as engine mounts. While I was down there, I also decided to remove the stock footpeg mounts. Tons of grinding in a hot little garage on a 100°F+ day!!
The end result was very satisfying! Tomorrow I will take the new unmolested seat pan and fit it to the pins on the bike, that way I can send it out for paint. I need to remove the steering lock stuff (door, pin and lock core if possible), the do a final sand on the ground areas of the frame, then it'll be ready for powdercoating. I'll try and cut and shape the front fender tomorrow, so I can run all the parts out for paint this week.
After all the parts have been prepped for powdercoating and paint, then I'm free to continue working on the DMV build, so I can get the bike registered! One step at a time....
At the beginning of the week, I tore apart the carburetors to take inventory of what parts I actually still need. I cleaned and rebuilt these carbs over 10 years ago, then put them in a box for safe keeping. At the time, I did take notes of what was needed, but now looking back, the notes were unclear and incomplete- the only way to be certain of needed parts was to do another tear down and take inventory. Luckily the only parts needed were the main and pilot jets- exactly what Paul told me I needed to order for the newly built engine! I turned to my trusty source, economycycle.com, and ordered a range of Mikuni mains from 250-280 and pilot jets in 30.

For the past 2 days, I've been working on fitting the seat pan to the frame and grinding off unnecessary metal. My final seat pan fixture system was four clevis pins brazed to the frame. That way, I can just remove the clevis pins and the seat comes off. (I still need to access beneath the seat to fill the oil tank.) I also fabricated a license plate and LED brake light mount out of some leftover steel I had laying around from some previous project, then brazed those onto the back of the frame.

I removed the two grommet tabs which used to hold the stock airbox in place. I also ground off the center stand mounts that stick out off the rear of the frame, being careful not to cut too much away, since the right side holds the brake pedal spring mount peg, and both are used as engine mounts. While I was down there, I also decided to remove the stock footpeg mounts. Tons of grinding in a hot little garage on a 100°F+ day!!
The end result was very satisfying! Tomorrow I will take the new unmolested seat pan and fit it to the pins on the bike, that way I can send it out for paint. I need to remove the steering lock stuff (door, pin and lock core if possible), the do a final sand on the ground areas of the frame, then it'll be ready for powdercoating. I'll try and cut and shape the front fender tomorrow, so I can run all the parts out for paint this week.
After all the parts have been prepped for powdercoating and paint, then I'm free to continue working on the DMV build, so I can get the bike registered! One step at a time....
Sunday, July 21, 2019
The Heart of the Matter
Today is the day I have dreamt about for a very long time. My RD400 motor was assembled and ready to be picked up!! I arrived a few minute before 9am at Paul's house. As always, he had his garage opened already and was waiting for me. I saw the engine and tt was beautiful!
He helped me install the shift rod and tachometer drive components. Then he went over the break-in routine for the motor. Of course, half of that went in one ear and out the other. We told stories, he helped me to load all the parts into my Jeep, then I was off.
 I spent part of the rest of the day cleaning engine mounting parts, mixing and matching with a spare set that I had on hand. One of my front mount spacer tubes got slightly dented, so the mounting bolt didn't want to slide through, meaning I had to use one of the yucky corroded ones. I tried cleaning/polishing it for a while with some success, but in the end, I just wanted to plug the motor in the frame, so the refurbishing will have to wait till the motor moves to the other frame. I also discovered that I am one rear mounting bolt short of a full set! After scouring through my archive of old documentation photos, I noticed that I never even had one in the first place! Thank God for eBay! In the end, I was successful in mounting the motor in the frame, minus one rear mounting bolt.
I fitted the carbs on the engine, then the Y-boot with the K&N air filter on it. (I still have to locate the manifold clamps. I hope I don't need to order more parts!) Surprisingly, the filter sticks way above the frame rails where the new seat will go. Hmmm...I don't ever recall anyone making mention of this problem. I do know that K&N makes a shorter filter. Maybe others have been using the short filters? In any case, I do happen to have a foam Unifilter that I can fit on there if I don't feel like buying a another K&N filter.
 This week is going to be hella busy. I'm working a shit ton of hours and weird shifts, due to coworkers taking random vacation days off, and the management not hiring much needed extra help. I'm also shoving off for a cruise to Alaska on Friday. Of course I have to work all the way through Thursday, then take my dog and drop off a second car at a relative's house after work, not to mention that it's actually my birthday that day :(
But if I get the chance, I would love to start hooking up some cables, getting a little closer to a "complete" bike, so I can get the bike VIN verified by my local DMV. What a total hassle!!!!
He helped me install the shift rod and tachometer drive components. Then he went over the break-in routine for the motor. Of course, half of that went in one ear and out the other. We told stories, he helped me to load all the parts into my Jeep, then I was off.

I fitted the carbs on the engine, then the Y-boot with the K&N air filter on it. (I still have to locate the manifold clamps. I hope I don't need to order more parts!) Surprisingly, the filter sticks way above the frame rails where the new seat will go. Hmmm...I don't ever recall anyone making mention of this problem. I do know that K&N makes a shorter filter. Maybe others have been using the short filters? In any case, I do happen to have a foam Unifilter that I can fit on there if I don't feel like buying a another K&N filter.

But if I get the chance, I would love to start hooking up some cables, getting a little closer to a "complete" bike, so I can get the bike VIN verified by my local DMV. What a total hassle!!!!
Friday, July 5, 2019
Learning to Braze
Lately I've been inundated with work hours, plus other shit is going down in my life lately. So work on the RD has been slow lately. I've kind of been dragging my feet- some of it is just laziness, as I've been stuck in my head about solutions for seat mounting and stuff.
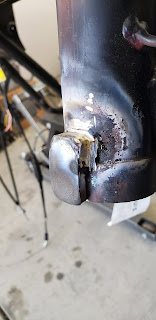
I have two RD400 frames and on both of them, the steering stopper tab/button has been knocked off. I was lucky enough to be able to relocate one of the original tabs- it was from my original Marsh frame. Since I will be riding the Primrose frame, the one that I'll be cutting up, I really need to have a button on that one. In case you have no idea what piece I'm speaking of, from the Yamaha factory, there is a small metal tab that is welded to the front of the headstock. It works in conjunction with the bottom triple tree clamp, which has a couple of stopper tabs sticking up. If the handlebars move too far to the left or to the right, the triple tree tab will effectively hit the stationary stopper welded to the headstock, preventing the steering from turning any further, therefore (in theory) stopping your handlebar (or triple tree nut) from putting a dent in your gas tank. Well, my bike has gone down a few times and the force of the crashes were probably strong enough to break the welds. I presume the Primrose frame suffered the same fate.
After putting some thought into how to address my missing steering stopper tab, I eventually decided to try brazing it back onto the frame myself. So I'm stealing the tab off the Marsh frame and brazing it onto the Primrose frame. The first attempt didn't go so good. I was smart enough to know that I needed a hotter flame than propane, so I bought a canister of map gas. But still that steel was way too thick to let the heat penetrate.
I thought that maybe a better torch handle could bring more heat, so I stopped by my local Lowes hardware store. They just happened to have a Bernzomatic kit that came with map gas and oxygen!! For only $70, it was worth giving it a whack. After I bough it, I went home and read the reviews, which were not good. Apparently people were having problems with the flame blowing out and the sensitivity of the controls. I searched a little more and found some helpful videos on how to get the flame to ignite and how to do careful adjustments.
This video is really a life-saver! It will save you from valuable minutes of wasted oxygen consumption.
It really didn't take long for the headstock metal to heat up. I used the bronze rod and after doing three sides, the welds seemed very strong! I am confident this stopper will hold, even after a crash!


So now that I have a little bit of brazing skills, I'm probably going to braze some nuts or T-nuts directly to the frame, so I can fasten the seat pan down. I believe that I will also have to braze a cross-member to the back of the frame, so I have somewhere to mount the rear brake lamp. I'm still working out the details and dimensions on these last two points. When these things are done, I can finally take this frame to the powdercoater! And when I finally cut down that front fender, I'll be able to haul all my parts to my Sacramento painter!
Thursday, June 27, 2019
Let There Be Light!!
Well, as soon as I can hook up the harness and the battery, there will be light...

In one of my earlier entries, I noted that my headlight rim was severely scratched. I just picked it up today from High Lustre Chrome Plating in Hayward this morning.Rich did a phenomenal job on the rim. It actually does look better than brand new. He charged me $125 for the job (although he quoted me $90 over the phone), but his turn around was like 3 business days!
 Over the past few days, I bought a few LED lighting pieces for the bike- 2 turn signal sets and a brake lamp. All the items arrived already, so I got to work on mounting up the headlamp assembly. Some of my headlamp parts were missing or too damaged to use. Good thing I had a second headlamp bucket and parts! I bought a new reproduction mount kit from EconomyCycle to help with the mounting. The holes in the aluminum ears that I bought were a little too small, so I had to file on them for a bit with a rat-tail file. I also upgraded the headlight to a Hella H4 headlight and replaced the supplied H4 bulb with a PIAA Night-Tech 60/55W bulb- that should make huge difference in seeing at night! Everything went together beautifully! So now the front end is pretty much finished with the exception of reshaping and painting the front fender. Oh, and I still need to get those wheels finished!
Paul asked me to get a few missing and worn parts. I ordered them from Partzilla, since they seem to have the best OEM prices around. Unfortunately, they're waiting on one part to arrive before shipping them out to me, so this order will take about 2 weeks to process :(
In the meanwhile, I picked up my freshly honed cylinders last Sunday. After all the honing oil and Simple Green, the paint job I had done was fairly ruined. (He did warn me about that, but I just wanted to get them painted, while they were not assembled yet.) I just repainted them again. It didn't take long since I had done them once before. I'll return them this Sunday, so Paul can resume work on the motor.
I'm still awaiting my replacement seat pan from the UK. It should be here on Saturday. When that arrives, I can pull out the other frame and start fitting the seat to it. I will probably have to grind off the hinges and the seat lock, possibly even cut off the end of the frame. After I weld a chunk of metal to the front of the headstock (the steering turn-to-turn lock), I can take the frame down to the powdercoater to shoot the paint.
If I can get the front fender shaped, I can drop off all the parts to Ryan, my painter. So if I'm lucky, the motor, the frame and the painted parts will be ready all at the same time! Now this has become an exercise in project management! We're really starting to come to a close fast!

In one of my earlier entries, I noted that my headlight rim was severely scratched. I just picked it up today from High Lustre Chrome Plating in Hayward this morning.Rich did a phenomenal job on the rim. It actually does look better than brand new. He charged me $125 for the job (although he quoted me $90 over the phone), but his turn around was like 3 business days!

Paul asked me to get a few missing and worn parts. I ordered them from Partzilla, since they seem to have the best OEM prices around. Unfortunately, they're waiting on one part to arrive before shipping them out to me, so this order will take about 2 weeks to process :(
In the meanwhile, I picked up my freshly honed cylinders last Sunday. After all the honing oil and Simple Green, the paint job I had done was fairly ruined. (He did warn me about that, but I just wanted to get them painted, while they were not assembled yet.) I just repainted them again. It didn't take long since I had done them once before. I'll return them this Sunday, so Paul can resume work on the motor.
I'm still awaiting my replacement seat pan from the UK. It should be here on Saturday. When that arrives, I can pull out the other frame and start fitting the seat to it. I will probably have to grind off the hinges and the seat lock, possibly even cut off the end of the frame. After I weld a chunk of metal to the front of the headstock (the steering turn-to-turn lock), I can take the frame down to the powdercoater to shoot the paint.
If I can get the front fender shaped, I can drop off all the parts to Ryan, my painter. So if I'm lucky, the motor, the frame and the painted parts will be ready all at the same time! Now this has become an exercise in project management! We're really starting to come to a close fast!
Monday, June 17, 2019
The Next Steps
So I had to order all new wheel bearings, since I changed design plans away from the RD350 wire wheels. Now I have TWO sets of All Balls wheel bearings! I disassembled the rear sprocket and gave that wheel a good decent scrubbing. I did attempt to remove the old rear tire, but it was a no-go. After finding some help in the internet, I bought a good utility knife and I'll swap out the straight blades for hook blades. Those beads are not going to play nice, so I'm just going to cut the old rubber off of the wheels. I'm sure they won't be a problem, when mounting the new tires on them. After that, I can repaint them, polish the rims and get some fresh bearings in there. Once the tires and wheels are on the bike, I can verifiable claim that I have a "roller"!!
When the seat comes in, I'll have to figure out how to mount that sucker and what might need to get cut off the frame (the other frame). When that is sorted out, I can send the parts off to paint. There still is that issue about the front fender. I do believe that I will cut it down, but I'm thinking that I may just leave it chrome. Maybe not. I still haven't figured it out yet.
I need a brake light system and turn signals for front and back. I am not a big fan of the rear "integrated" turn signals. A new battery is on the way, so I need to refurbish the old battery box. At that point, I may as well try and string in the entire electrical.
Once the engine and the painted pieces come back, I'm just about ready to complete the bike! For the first reincarnation, but bike will have the old ugly seat, just so I can get it to the the DMV for inspection as a "whole" bike. Afterwards, the parts will get transferred to a cut and powder-coated frame for final assembly!
Thursday, June 13, 2019
Latest Updates

Last Sunday, I dropped off all the motor parts with Paul. I think he was surprised at how nice all the parts were looking. He was definitely a little amazed at how I was able to find some of the NOS parts out there, especially at such reasonable prices. But then again, I had forever to collect all of these things- when time is on your side, anything is possible! It's going to take 3-4 weeks before I get the motor back, depending how busy he is in his life and if any parts are missing and still need ordering.
So now I can focus on some of the other smaller matters. I swapped out the Woodcraft clip-on bars. They are a little longer and they are black as opposed to the chrome bars that came with the sale. Even though they have a little more length, the mounting assembly still gets in the way of the master cylinder- I think that I'll just need to shim it with a thin slab of aluminum- that should fix and secure it good.
I did receive another used meter bracket off of eBay. It was claimed to be straight and unbent. I also came with the four black chrome screws to hold down the turn signal cover. When it arrived, it was 95% straight with one of the meter tabs slightly bent up. I messaged the seller and he gave me $15 to keep it. I was successfully able to pound it back to a workable angle. Then I painted the bracket and meter covers. Everything mounted up beautifully. I attached the speedo, tach, clutch and throttle cables and called it a day.
I tried to polish out all the scratches on the headlight rim, but it ain't looking too good. After searching for a new or even good conditioned old one on the inter-web, I called up a few local plating shops. This one shop in Hayward quoted me an estimate of $90 to do the job. Not bad. I think I'll take it! So the front end assembly will have to wait until I get the rim back.
I have been searching for the proper seat for months now! I knew for sure that I didn't want a big OEM saddle, one that uses that gigantic seat pan. I really wanted a cafe-style seat with a hump. I had to come up with a solution for filling the 2-stroke oil though. I think I'm just going to keep the filler in the same position, but I may have to cut down the length of the dip stick. I'll mount the seat on a mounting board to give it some height and flexibility on how to mount it, and I'll put it on a hinge attached to the rear of the seat- that way I can [somehow] unlatch the front, tilt the seat back and fill the oil. I carefully did some measurements to figure out what would be my ideal length and I ultimately decided on this seat. With VAT and shipping, it came to just under $210, complete with upholstery. I'm still working on a solution for the gaping hole it's going to leave at the gas tank, but I'm getting closer to a final solution. This seat is actually so long that I don't think I'll even need to cut off the end of the frame. But I will probably have to grind off the hinges and the lock mount.
I'm looking for turn signals now, front and rear. I think I'll get an LED brake light/license plate mount combo thingy. That should work out fine.
More to come.....
Wednesday, June 5, 2019
Engine Cosmetics Just About Done!
I'm meeting up with my engine builder on Sunday to drop off all the parts. It's my last push to paint, polish and shine all the exterior engine parts, before handing everything over.
For the past 3 months, I've been trying to buy everything needed to get this motor done right. I've bought almost all Yamaha OEM engine parts, with the exception of the connecting rods, some gaskets and miscellaneous parts that were sourced by Yamaha at the time i.e. Sudco seals, etc.
Here's some before and after pictures of the head.

 The first thing I did was strip down and polish the Daytona head. I actually started the stripping process 10 years ago, but then just stopped. I've had to buy a used right side engine cover, since one of the allen bolt tabs was broken off. I probably bought the bike like that. All the covers were cleaned, degreased, paint stripped, then painted with PJ1 satin black. I media blasted both cylinders and the inside fins of the head with walnut shell, then painted those with PJ1 high temp flat black paint. Afterwards I took a Dremel flap wheel to the edges. Everything came out fantastic!

 Originally I thought I was going to media blast the engine case too, but in the end, I just took some aluminum polish to it and polished it up by hand. I bought some stainless steel allen bolts for the covers on eBay. The finished product should look fabulous!
The build process should take about 3-4 weeks, depending on what Paul has got going on in his private life and how many parts might need to be ordered. I'm pretty confident that he will have all he needs to get complete the job. After the initial build, I'll install the motor, finish the build, and hopefully the bike will start up. I may just bring the bike back to Paul on a trailer, before the inaugural start up, just in case I missed something critical in the build process.
Here's a quick mock-up of the motor- just a glimpse of the what the motor might look like when it's done.

For the past 3 months, I've been trying to buy everything needed to get this motor done right. I've bought almost all Yamaha OEM engine parts, with the exception of the connecting rods, some gaskets and miscellaneous parts that were sourced by Yamaha at the time i.e. Sudco seals, etc.
Here's some before and after pictures of the head.


The build process should take about 3-4 weeks, depending on what Paul has got going on in his private life and how many parts might need to be ordered. I'm pretty confident that he will have all he needs to get complete the job. After the initial build, I'll install the motor, finish the build, and hopefully the bike will start up. I may just bring the bike back to Paul on a trailer, before the inaugural start up, just in case I missed something critical in the build process.
Here's a quick mock-up of the motor- just a glimpse of the what the motor might look like when it's done.

Subscribe to:
Comments (Atom)