Wednesday, December 31, 2008

Motor's Almost Out

Today, I made huge gains in getting that motor on my bench. I was still having trouble figuring out how to detach the wires from the generator. So I decided to empty out more of the frame, pulling out the oil reservoir, battery box and lower half of the air box. That left most of the electrical harness and components exposed and easy to see.

A long time ago, I was having some weird electrical issues, so I took my bike to this shop, where the owner went by the name Grumpy Bear. He told me that he had to do some creative wiring, but that old bike fired right up and I never had electrical problems again, so he must've know what he was doing. But now that I'm in there really examining things, I noticed that he by-passed the customary plastic connectors and just hard-wired the motor to the electrical harness. Umm...okay...so it worked, but that's not really the way to do things, and it's really not cool. So after cleaning the wires, so I could actually see what colors they were, I labeled them and then cut them. I might need to know this stuff for later reference. But if I end up going with a new ignition that eliminates the battery, it will have it's own wiring. And I do happen to have a electrical harness in very good shape I just recently purchased, so the labeling might not even matter.


I was then able to remove the generator. In order to take the generator out, I had to remove the engine clutch cover, so I could stop the center bolt from spinning, during the removal process. Surprisingly, the clutch was in very good shape- all nice and clean. Matter of fact, when I drained the oil from the engine, there was still about two quarts of oil in the case! I just thought that after leaking all over my parent's garage floor, there would be no motor oil left in there. I finished the night but locating and loosening all the motor mount bolts, readying them for the next day.

Monday, December 29, 2008

Carbs Done with their Cleaning

Today I had a glimpse into the future. This is how I picture my retirement- sitting at the breakfast table scrubbing vintage motorcycle parts, while cooking shows on the Food Network play in the background. What more could I want?

Finally I'm done with all the scrubbing and polishing. I would say that each carburetor took about six hours of labor. The carbs look good as new!

It was a task that obviously had to get done, not only for the sake of their ungodly appearances, but to clean out all that crap that's been sitting on the insides for the past ten plus years. The last time I ever tinkered with them, I had close to no mechanical experience with motorcycles, so when I had jetting problems, I turned to the "professionals", taking the bike to small two-stroke shops. Well, I found all sorts of little parts missing like washers and a spring.

Lots of parts needed attention. The slide in the left carb was frozen in place- gunk had solidified and glued it into place. Both needle jets needed to get popped out- there was so much corrosion and grit in the emulsion tubes- the jets are wasted. The air jets were caked with solid gunk, like barnacles on to a rock. The corrosion was so bad in the left carb float assembly that it had eaten away a good portion of the main jet support. I'm ordering new o-rings and gaskets as well as a spring for both carburetors.

Here are some before and after pictures of the carbs. My method of cleaning them 1) soak and scrub them in a cocktail of kerosene and carb cleaner 2) scrub them with Barkeepers Friend then 3) polish the parts with Never-Dull. Hence six hours per carb.


Saturday, December 20, 2008

Got Sidetracked

For some reason, I just felt like working on the carbs today. I pulled both carbs out of the holding box and examined them closely. Maybe it was the simple challenge of getting them to look new again, but I was so inclined to just begin working on those before yanking the motor. It was certainly a shorter and easier goal to achieve- the satisfaction of success was just days away, rather than months away. So I grabbed the right carb, since I knew it wasn't stuck, plus it was the simpler of the two, since there was no choke assembly to mess with. The arduous process began.

Sunday, December 14, 2008

Only the Beginning

For some crazy reason, today I decided to start dismantling the motorcycle. I just passed a major milestone in my network professional career, passing my first Cisco certification test. I guess I was just feeling like a little reward was appropriate and this is what I came up with. After all, I've been waiting forever for the chance to really start the restoration. Last year, I started taking the front brake system apart (master cylinder and brake line), but I never even got around to rebuilding it, so that doesn't really count.

I cleared some space in the garage, kicking the SUV out into the wet and cold weather, and got some cardboard in place. Funny, but that fancy motorcycle stand I bought, that's supposed to work with all types of bikes, didn't really want to work with this bike. First, I couldn't get the brackets to move in close enough to support the swingarm. I flipped the brackets around and got them to kind of work- good enough for now. The rear tire wasn't even off the ground, but that's okay for today. And away I went.

My initial goal is to try and get the new motor built in the Spring. I've emailed an old Yamaha mechanic who lives in Castro Valley about doing some work and he's agree. I met him some six or seven years ago, buying parts off of Ebay. He was one of the sellers. I was living in Castro Valley at the time, so I just did a local pick up. He is continuously building RD's and seems to have a neverending supply of old parts. He mostly refurbishes the old parts and hawks them on Ebay. I will probably do most of the engine build myself, including rebuilding (and possibly welding) the crank. But porting is a mystery to me. He has agreed to do the cylinder porting, boring and honing. So I first need to get the motor out of the old frame, so I can tear it down to see what it needs, i.e. piston sizes.

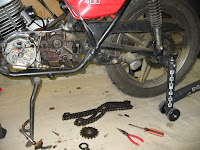
I removed the gas tank, carburetors, most of the airbox, battery and engine covers. Man! what a mess!! The front counter sprocket was so loose that I was able to break it loose with my fingers! Usually you'd need a big socket (28 or 32mm) and a breaker bar to get that sucker off. I pried off the masterlink on the chain and removed that dirty stinking chain. I then was able to remove the counter sprocket and flat washer from the shaft.

That was all for now. Although I didn't get the motor out yet, I was off to a really good start! When the engine is on my bench, I can move the bike back to it's cubby-hole and move the truck back in the garage. I've got another bottom end of an RD400 motor I need to inspect and get refamiliarized with. (I purchased it off of Ebay about five years ago.) It came with a fresh transmission and clutch assembly. So I can actually sell my old engine case and recoup some cash back.

Saturday, December 13, 2008

Disclaimer, etc.

It's very ambitious, this restoration undertaking. I've got no formal mechanical training, besides being formally trained at my local REI as a bicycle and ski technician. I guess after wrenching on bicycles for so long (building a good number of personal bikes from scratch), I graduated to working on my Suzuki SV650. Most of my resources are straight off the Internet. In addition to public blogs and forums, I do happen to have a very old Clymer manual, something I bought when I bought the RD.

My design of the bike will be of my own. Many before me have done practically the same thing, but I'm not mimicking anyone's exact layout. I've had years to think about what I'm going to do with this bike and my ideas change all the time. As a matter of fact, I didn't really even consider doing wire-spoke wheels till just recently. When I saw a great deal on Ebay, I just couldn't pass it up! I have a pretty firm idea of what I'm going to do with the bike, but things might change.

Friday, December 12, 2008

About Myself...About My Bike

I'm your average forty-something motorcycle loving geek. I was born and raised in beautiful sunny California. I've spent a few years living in Colorado, while attending CU Boulder, but now I'm back in Northern California- the East Bay to be more precise. I've been riding since I was twenty-one and have only owned two bikes in my life- this one and my daily driver, my 2001 Suzuki SV650S, which has been severely prepped for the track, but is still cloaked in street-legal garb. I got my degree in computer science some time back and am fortunately employed with a networking company, consulting, designing and implementing mainly Cisco equipment for large businesses like hospital systems. I'm a pretty avid DIY'er and get my hands into projects at home, whenever I can.

During my long illustrious college career, I had a stop along the way in San Luis Obispo, California, while attending Cabrillo College. The year was 1986. I picked up the current Motorcyclist magazine. This was a defining moment- this one action changed my life. I was fascinated with all the technical articles- James Parker had a new front swingarm design, and there was a great article on physics and frame design. With all of its innovations, the GSX-R was named bike of the year. I was hooked on motorcycles!

Well, way down Higuera Street, across from the DMV, there was a small motorcycle dealership. From time to time, I'd wander in just so I could sit on a GSX-R. Along with their selection of new bikes, they sold used bikes on consignment. I spotted this 1977 Chappy Red Yamaha RD400 motorcycle sitting in the front lot. I had seen these bikes around before and always liked the cafe way they looked. Naturally, I asked the salesman if I could go for a test ride. He told me that in order for me to take a test ride, I needed three things 1) a motorcycle license or permit 2) long pants and 3) a helmet, which he would provide. Since I was wearing shorts, I told him I'd see him the next day. I immediately went across the street to the DMV and without even looking at the drivers manual, I took the motorcycle permit test. I passed with no problem and left with permit in hand.

The next day, I returned to the dealership in pants for my test ride . I had very little experience riding motorcycles. I had taken a handful of rides on the back of my friends' bikes and a friend had given my a quick tutorial a few years back, but I was by no means an experienced rider. The salesman gave me a helmet and I was off. I was slow, paranoid and a little too careful, but I could see that the bike worked. The owner wanted $500 for it, but after the sales guy called him, he lowered his price to $400. I put it on my Mastercard and rode off. I had no idea what I was in for.

I rode the bike off and on for the next seven years. The bike was always in some state of disrepair. Once one of the exhaust chambers fell off while I was riding. When I later went back to retrieve the pipe with my car, it had already disappeared. During my years in Boulder, the bike sat on my friend's apartment porch, where some friendly neighbors helped themselves to my ignition. Once an angry ex-girlfriend had someone cut my throttle cable. I always had carb problems. and in the end, it was the suspension that tried to drive me into a tree. For years after, my bike sat in various garages, mostly my parent's, while I was living in apartments. Lately, it's been sitting in my garage, waiting for the day it's going to get restored.

For the past ten years, I've been purchasing parts off of Ebay. I let my registration go long ago, figuring that if the bike ever gets built, it'll be strictly a track bike. Somewhere along the way, I changed my mind, so I bought a frame, complete with current registration, off of Ebay. I've got all sorts of goodies (electrical harnesses, electrical switches, forks, bottom end of the motor, Daytona head, etc.) and I've had enough time to figure out what I'm going to do, so finally...it's time.

My goal is to build a repli-racer of sorts, modeled from the old-styled TD3, TR3, TZ250/350's. I'm going with the longer gas tank, Clubman bars, solo seat, wire-spoke wheels (with a drum brake in the rear) and a slightly modified engine. I'm trying to design the bike with the lack of a battery, so I'll get that see through the frame appearance, but I might have to go with a really small battery and tuck in, along with the electrical components, in the seat cowl. I'll have to figure out how to do the turn signals (front and back) and the license plate and light. The first incarnation of the bike will be with a front headlight- I'll figure out the fairing stuff later. I'll probably have to fabricate rearsets myself, since Motocarrera looks like they went AWOL. I'm not crazy about the Raask rearsets. The motor will get all new seals, bearings and gaskets. I'll bore and hone the cylinders and get a mild porting job, if I can find someone trustworthy to do it. I'll cap it with the Daytona head. For the intake, I'm doing a crossover, Boysen reeds and a Y-boot with K&N filter. The exhaust will be built by Zero Factory in Torrance, California. I'm guessing this project will take about two years to complete. When it's done, I'm hitting the track!

Sunday, August 17, 2008

Short Ride- Change of Plans

My plan was to go for a nice ride to the end of Del Puerto Canyon.  The weather was nice- a beautiful 89 degree day with blue skies.  I got dressed in leathers and headed out to Mines Road in Livermore.
Mines Road up to the Del Valle split was pretty good, as I was following a couple other motorcyclists.  After the split, I started heading up the twisty hill.  About two miles in, I was hearing weird pinging noises.  At first, I wasn't sure what the noise was, but after I looked down, I realized that it was the gravel in the road being kicked up by my tires, bouncing off my exhaust system.  There was a  LOT of loose gravel in the road.  I rode for about another mile, but after almost having the bike slip out from under me on a tight right-hand turn, I decided that the rest of the ride was going to be unenjoyable, so I doubled back.
After I popped out from Mines, I decided to just make the best of the afternoon and to take 84 back to 680, just so I could get in somewhat of a ride.  84 was nice and clear, not much traffic and no road hazards.  I got back on 680, heading toward home and jumped on the throttle a little, just to open up the carbs.  All good was restored again.

Sunday, August 3, 2008

Windmills

I got up this morning, had my two wonderful cups of coffee that Emily makes with such excellent technique, then installed my new CRG levers.  I was planning on a ride this afternoon, so after the installation, I did a quickie ride around the block to see how they felt and to make sure the angles and reach were the way I like it.  Everything checked out.
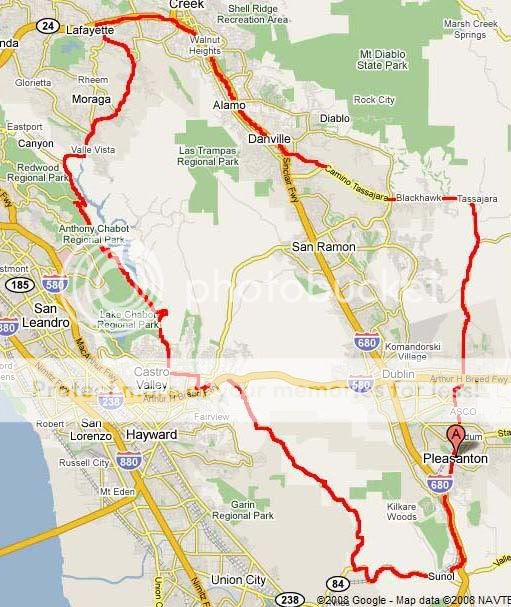
Being a little short on time, I decided to do a short ride, just to get some turns in.  I haven't done Patterson Pass for about a year, so that's what I chose.
Click on image to enlarge
I got in my leathers and off I went.  This route is great for testing out changes that I've made on the Wrath, since there's a bit of everything on the ride- city streets, freeways and twisties.
The bike ran excellent and the new levers felt like I've been using them for years.
All-in-all, it was a nice ride.  Only one car got in front of me, but he waved me by.  The view of the windmills from the top of the pass is awesome.  The temperature was 82 degrees and the sun was out.  It got a little windy coming back over the pass, but not too bad.

Sunday, July 27, 2008

Sunday Ride

What a great day for a ride!  I didn't leave until 4:30, but by then, a lot of the traffic had gone home.  The sun was out for most of the ride and it was 77 degrees Fahrenheit- my kind of riding conditions!
Right before the ride, I tightened up the chain and filled the tires up a little, and I noticed the difference immediately.  When hitting Palomares Road, near the last stretch of the road, a ranching truck pulled out in front of me, but turned into another driveway half a mile down the road.  That was the only vehicle I had to wait on for all of Palomares!
On the Redwood/Pinehurst/Canyon section, I caught warning by other passing riders, that there was LEO up ahead.  He was writing up a fellow rider.  Thanks for the heads-up, guys!  I only had one car slow me down on the last part of Pinehurst, but he pulled over almost immediately.
All in all, it was an awesome 73-mile ride with very little interference from other motorists.  The bike is running like a champ and my riding is getting smoother.  The bike missed one shift, but I had no brain-farts.  Today's ride was the best in a long time!

Competition Werkes LED Flush Mount Installation

Well, after a very long search, I have found some inset flush mount LED signals that will work with the 1st generation SV650s. The installation went straight forward with little problems.
Step 1. Take the fairings off the bike and disconnect the lights.
Step 2. Remove the old lights from the fairings.
Step 3. Because the marker hole in the fairing only has a couple of tabs for the light to sit on, you'll want to create a platform interface for the light to rest on. I found an old DVD case to work with- it's sturdy enough to get the job done, yet soft enough to cut out and trim with scissors. Once you get the insert to fit correctly (tightly), place the marker light on top of it and spot out where the stalk will eventually thread through it, mark it with a pen and drill a hole through it. I used a 5/16" drill bit.
Step 4.   If you look on the backside of the hole in the fairing, you'll see that the screw retention holes for the original marker lights protrude a little higher than the rest of the surface.  Take a Dremel and grind those down, so that the screw retainer disc for the new lights will be screw on flat.
Step 5.   Cut off the electrical connector and solder on the OEM connector.  Wrap each wire with electrical tape.  Note- The black wire does not mate with the black wire!
Step 6.   Screw the new marker light into the fairing.  Attach the connectors together.  Put the fairings on and you're good to go!!

Sunday, July 20, 2008

Laguna Seca MotoGP 2008


Yes, I was there. And it was one of the best motorcycle races I can ever recall. I saw the unlikely- Valentino Rossi beating archrival Casey Stoner in a battle of wits. It was awesome!
My day started early- I was up at 5am. My friends wanted to meet in Newark at 6:30am, so that we could see some of practice runs. Attendees included Christopher Layne, Joe Keto, Richard, and Dan. Most of them were acquainted from working at Guava, a biotech equipment manufacturer.
The ride down was uneventful and entry to the racetrack via shuttle bus was easy. We quickly found our way to turn 2, where we set up shop to watch some of the practice runs. The weather was quite cold, a mere 61 degrees F, and the word was that the Dunlop racers only had hard compound tires to race on, betting that the track would be hot. The race would favor the Michelin riders.
After spectating the warmup laps, we walked down to the vendor area, where we saw some exhibit trials riding and did a bit of window shopping, before foraging for food. Lunch consisted of two very large weiners, one bratwurst and one Louisiana hot link, both $8 and both were actually very excellent.
It was time to make our ways to watch the main event. Chris, Dan and I all purchased turn 4 grandstand seats, but Chris compelled me to ditch the seats for a more mobile option. I hadn't seen Chris for about five years and I decided, since he had decided to head for the hills and forgoe his grandstand seat to spend some quality time with him, so I did the same. And I was sure glad I did!
From the hill, we had a view of turns 1-5, 10 and 11- an excellent vantage point indeed! Within the first ten minutes, we watched and heard over the PA that Rossi and Stoner were constantly trading off the first position. The race was totally cat and mouse with the second rider always close behind the leader. The first two riders was racing at such a blistering pace, the rest of the pack was soon ten seconds behind!
After a short visit to the Corkscrew, I returned back to my original viewing position. A short time later, I watched, as Stoner was following in second, pushing harder and harder to pass Rossi. Then came the unthinkable, in turn 11, Stoner slowly went wide off the course and dumped his bike!! Rossi was GONE! Amazingly, Stoner's bike was still running, so he mounted his motorcycle and began his pursuit. The first two riders had such a commanding lead over the rest of the pack that even though Stoner crashed, he was still finished in second place, more than seventeen seconds behind Rossi.
All the laps leading up to the race indicated that Stoner would claim victory that day. His qualifying times were more than one second faster than the times from last year. Before the race, he boasted in interviews that he had no worries about the race and fully expected to win. But when it came down to brass tacks, Rossi rode flawlessly. There were aggressive passing moves and hard brake checks, but when you're racing at the top of your league, that's how racing can be. Stoner was not mentally prepared for such a formidable challenge. With Stoner following so closely behind, Rossi had to have a perfect day, never leaving an opportunity for Stoner to make a pass. And in the end, championship experience paid off for Rossi.